XNA in a Form: how to display a couple of 3D views
(level : medium)
By default, the XNA 1.0 framework allows you to render 2D and 3D graphics in full screen, or in the
entire client area of a simple window (on PC). But what about using it to
create tools and editors, written with C# and the Windows Forms, and containing
more than one 3D view?
In this article, I'm going to explain how to do this, while still begin able to rely on the
ContentManager class to load assets. I will also demonstrate how to write a
game loop properly, in order to refresh the views on a regular basis when this
is needed (for example, to display animations). Finally, I will revisit my 2003 article
an introduction to the High Level Shading Language with a simple example: 2-sided shader,
to show how to use a .fx file without the Model and ModelMesh classes.
download the source code for this sample (65 Kb) - XNA 1.0 Refresh
updated version for XNA 2.0 (66 Kb)
Setting up the project
Basically, what we want is a Visual Studio project that uses both the .NET Windows Forms and the XNA
framework. There are two ways of doing it, but one is much easier than the
other:
-
create a Windows Forms project ("Windows Application" in VS 2005 Express), and reference the XNA DLL's
from it. This is the hard way, because the .csproj file then needs to be
modified manually, if you want to have access to the Content Pipeline tab of
the properties, for example.
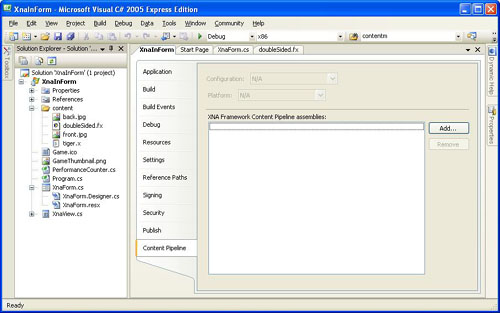
the Content Pipeline tab
-
create a PC XNA project ("Windows Game"), and reference System.Windows.Forms.
Here are the steps for the second method:
-
use "File | New Project..." to create a "Windows Game" application.
-
remove the Game1.cs file, since the main part of our program will be located in the form.
-
in the contextual menu of the project, use "Add | Windows Form..." to create a form. This will
automatically insert the required references into the project.
-
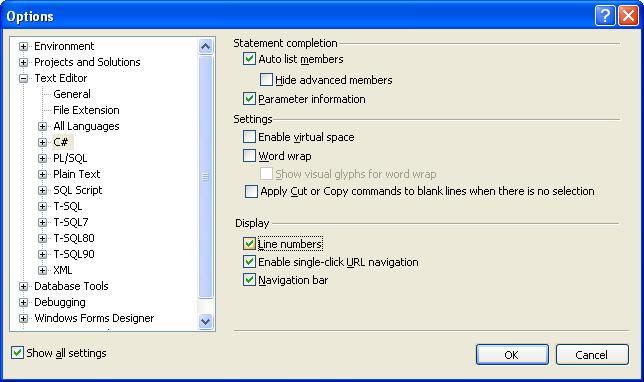
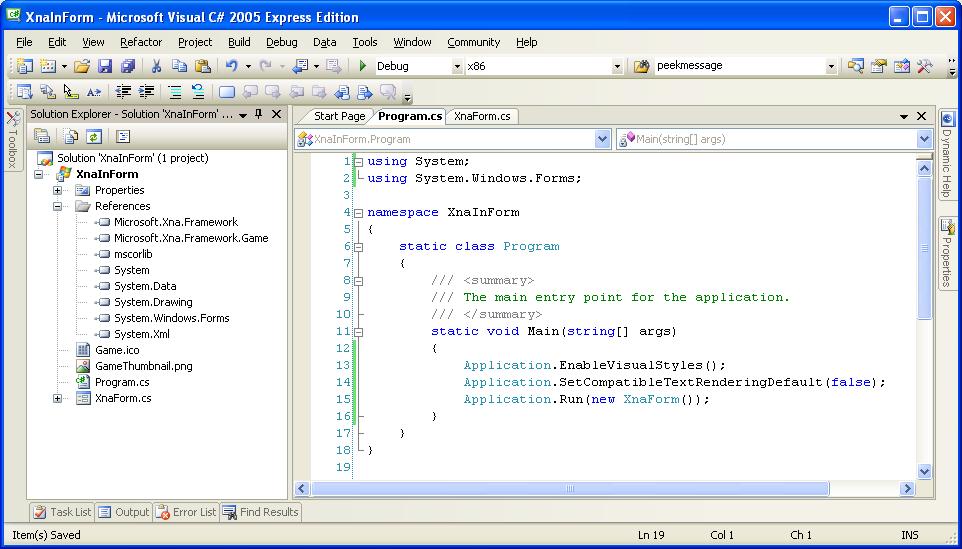
in Program.cs, modify the Main(...) function to make it create the form, and do not forget the "using
System.Windows.Forms" directive (see source code, line 2. To display line
numbers in VS 2005 Express, go to "Tools | Options...", and check the "Display |
Line numbers" box under the "Text Editor | C# | General" section).
-
everything should compile just fine, the program creates an empty form when you run it, and your
project should look like this:
Adding some views and controls
First, add a user control (Add | User Control...) to the project, name it XnaView, and compile:
this should make it available in the Toolbox. Important: another type of
control, a label for example, can not be used instead of a user control, or the
view will not be redrawn correctly when a window moves on top of it.
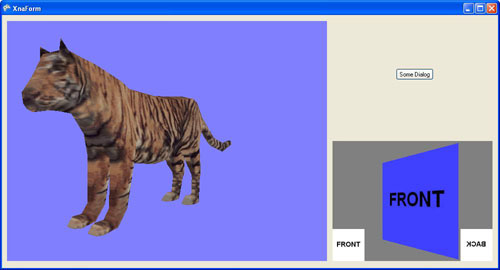
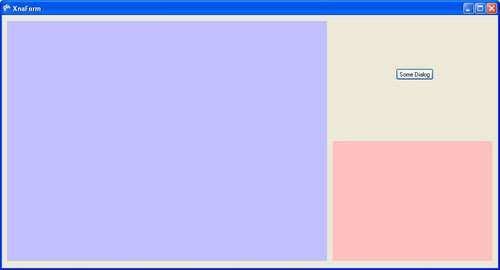
The time has come to open the form in design mode, change a few properties, such as its name, icon,
size (1000*540 in the sample), and add some controls as well as a couple of
XnaView's. In the code sample, the button "Some Dialog" opens a modal dialog
box, that I use to verify the 3D views are refreshed correctly when other
windows overlap them. In order to see where the XnaView controls are on the
form, you can change their BackColor property. After compiling, you should have
something similar to the following picture (note: in the sample, the dimensions
of the 3D views don't change if the form gets resized, this is left as an
exercise for the reader).
Implementing the user control
The code of the XnaView user control is very simple: since it could be used to display basically
anything, it doesn't contain any drawing code itself, but calls a delegate each
time the view needs to be refreshed. This is accomplished by overriding the
OnPaint method inherited from System.Windows.Forms.UserControl. Also, since we
know the control will be completely drawn each time, erasing it first with the
backColor is unnecessary, and can be prevented by overriding OnPaintBackGround
and making it an empty function.
        public delegate void PaintFunction(XnaView ctrl);
        private PaintFunction paintMe;

        protected override void OnPaint(PaintEventArgs e)
        {
            if(paintMe != null)
                paintMe(this);
        }

        protected override void OnPaintBackground(PaintEventArgs e)
        {
        }
|
Now the real problem is there are 2 views in the Form, which is not the case when using XNA's Game
class, which only handles one. In my article:
rendering to multiple views with DirectX : CreateAdditionalSwapChain,
I showed how to use swap chains to deal with this issue, but
swap chains don't exist in XNA. Instead, we can associate each view with a
render target and a depth buffer, that will be used to do the rendering, and
blit the resulting texture in the user control's window.
After each XnaView control is created by the code generated by the Form designer, its Initialize()
function is called to pass it the aforementioned delegate and a clear color, as
well as the application's graphics device which is needed to instantiate the
render target and the depth buffer. In the following code, the Width and Height
properties are inherited from the UserControl class:
        public void Initialize(GraphicsDevice gfxDevice, PaintFunction paintFct, Vector4 clearColor)
        {
            this.paintMe = paintFct;
            this.clearColor = clearColor;

            renderTarget = new RenderTarget2D(gfxDevice, Width, Height, 1, SurfaceFormat.Color);
            depthStencil = new DepthStencilBuffer(gfxDevice, Width, Height, DepthFormat.Depth24);
        }
|
Note: if the control was resizable, the render target and depth buffer would have to be recreated when
the width and height change.
Everything should still compile, but the views are not drawn yet; as we just saw, the next thing we
need for that is a graphics device.
Creating a graphics device and clearing the views
Since we are not using the Game class, we have to create the graphics device ourselves. This is easy,
just look at the code of the CreateDevice() method in XnaForm.cs. Of course,
the width and height of the back buffer must be at least as big as the biggest
view you are going to use.
Once the device is created, it can be passed to the two XnaView user controls, as mentioned
before. In the sample, these controls also both use the same Blit() method to
render their content. Since there is a Draw() function in the form's class, why
do the controls use the Blit() one? This is because each view being rendered
using a render target, and the result being stored in a texture, it is more
efficient to simply display this texture again when the control asks to be
redrawn (for example, when the test message box is moved in front of it),
instead of re-rendering the same frame from scratch.
In the code of Blit(), you can see that if no texture is associated to a given view, that view is
simply cleared (in red). Otherwise, a sprite is used to copy the texture into
the back buffer. The last line of the function is the one that makes the empty
view or the texture show up on the control.
After these changes, the two views are cleared with a red color.
Using the render targets from a game loop
Let's now have a look at the RenderToTexture() function, which takes a view and a function to render it
as parameters. Its code is pretty straightforward: it sets up the graphics
device to use the render target and depth buffer of the view, clears the
buffers, draws the scene, resolves the render target, and gets the result as a texture.
The Draw() function is the one calling RenderToTexture() for each view, and then Blit() to display the
results. But who calls Draw()? We have seen that if the control needs to be
refreshed, Blit() gets called; but if the user doesn't do anything, and we want
an animation to be played, Draw() needs to be called on a more or less regular
basis from a "game loop". You usually don't see the game loop, because it is
part of the Game class; fortunately, a small amount of code is enough to
implement it in the Form (see the end of XnaForm.cs), and attach it to the
OnIdle event. Note: this code wouldn't work on x360 - like the rest of the
article anyway, since we are talking about Forms.
Another case when Draw() would be called is obviously if the user did something with the user interface
(like clicking a button, for example) that triggers a change in the scene
(object added or moved, etc), or the way it is displayed. This is not really
demonstrated in the sample, since switching to wireframe mode with the W key,
for example, is handled in the Update() function - but if there was no game
loop, Draw() would have to be called after the wireframe flag is modified.
The two views are now cleared with their respective background colors. With a bit more code in
Application_Idle (and the PerformanceCounter class provided in the sample), an
Update() function can be called each frame, with a time parameter that can be
used to animate the scene.
Drawing a sprite and a mesh: how to use the Content Pipeline
Let's say we first want to draw a sprite in the smallest of the 2 views; the question is: how do we
load its texture using XNA's content pipeline? (Note: in a real application,
each view should be handled in its own class, but in the sample the
smallViewSprite SpriteBatch and the frontTexture and backTexture Texture2D's are
members of the main form, for simplicity's sake).
We start by adding the desired texture to the project, and then write some code to create the sprite
and load the texture:
            smallViewSprite = new SpriteBatch(gfxDevice);
            frontTexture = contentMgr.Load<Texture2D>("content/front");
|
But we don't have a content manager yet, and the constructor of this class requires some object
implementing the IServiceProvider interface. In the XNA framework, one class
doing exactly that is the GameServiceContainer class, which basically stores a
collection of services. This means we can create the content manager like this:
            GameServiceContainer services = new GameServiceContainer();
            contentMgr = new ContentManager(services);
|
The code compiles, and it would be enough for some types of content, but it crashes when loading the
texture: in order to instantiate graphics objects, the content manager
needs to find a service implementing the IGraphicsDeviceService interface in
the container that was passed to its constructor. Since this interface is
pretty simple, we can put a GfxService nested class that satisfies it in the
main form:
        class GfxService : IGraphicsDeviceService
        {
            GraphicsDevice gfxDevice;

            public GfxService(GraphicsDevice gfxDevice)
            {
                this.gfxDevice = gfxDevice;
                DeviceCreated = new EventHandler(DoNothing);
                DeviceDisposing = new EventHandler(DoNothing);
                DeviceReset = new EventHandler(DoNothing);
                DeviceResetting = new EventHandler(DoNothing);
            }

            public GraphicsDevice GraphicsDevice
            { get { return gfxDevice; } }

            public event EventHandler DeviceCreated;
            public event EventHandler DeviceDisposing;
            public event EventHandler DeviceReset;
            public event EventHandler DeviceResetting;

            void DoNothing(object o, EventArgs args)
            {
            }
        }
|
All it does is return the graphics device we pass it in the constructor. The four events have to be
supported even if they do nothing, because they are part of the interface. The
code previously used to create the content manager can now be modified to take
advantage of the new class:
GfxService gfxService = new GfxService(gfxDevice);
GameServiceContainer services = new GameServiceContainer();
services.AddService(typeof(IGraphicsDeviceService), gfxService);
contentMgr = new ContentManager(services);
|
Et voila! The texture is loaded correctly, and can be applied to our sprite, in the DrawSmallView() function.
There is nothing special about displaying a mesh in the biggest view. Since this is 3D graphics though,
some matrices have to be initialized, and can be dynamically changed in the
Update() function to make the object rotate. Note: to prevent the mesh from
suddenly turning by a huge amount after a pause happens when the test message
box is displayed, the "clock" needs to get fixed, as shown in the
someDialog_Click() function (comment out the last line if you want to see what
the problem is without it).
Warning: the Draw() method of the SpriteBatch class modifies some render states, which therefore
need to be reset correctly before drawing the mesh (or you will get very weird
results). The code sample takes care of this, and you can also read the
following explanation:
http://blogs.msdn.com/shawnhar/archive/2006/11/13/spritebatch-and-renderstates.aspx.
Bonus: 2-sided HLSL shader revisited
The goal of this section is to redo the same thing as in
my previous article from 2003
but with XNA, using a .fx file. At the same time, this will show how to use an effect
without relying on the Model or ModelMesh classes.
First, the sprite in the small view is replaced by a 3D quad, and the two textures it uses (one for each
side) are displayed in the bottom corners of the view (see screenshot at the
beginning of this article). The code creating the quad and loading the effect
is located in the constructor of the form, and in DrawSmallView() the quad is
drawn using the DrawUserPrimitives() method of the graphics device. Notice the
vertex declaration has to be set up before that, since it doesn't necessarily
match the one that was used to draw the previous object. The matrices from the
tiger object are reused to rotate the quad.
The effect is originally
a copy from the shaders of the initial article, with only a few parameters
renamed, and a technique with two passes added to it. I also changed a few
types, so that they better match what is strictly needed (float4 was used
almost everywhere in the old version). This works as expected, but like in the
original C++ article, the C# code has to change a few parameters between the
two passes (the cull mode, the multiplying factor for the normals, and the
texture), which makes it less reusable. It would be really cool to get rid of
this limitation, and as a matter of fact, the C# part of the program shouldn't
even know how many passes there are in the effect (so that any other effect can
be used instead of the two-sided one, with no modification). Basically, the
final code rendering the quad should look like this:
            doubleSidedFx.Begin();
            foreach(EffectPass pass in doubleSidedFx.CurrentTechnique.Passes)
            {
                pass.Begin();
                gfxDevice.DrawUserPrimitives<VertexPositionNormalTexture>(PrimitiveType.TriangleFan, quad, 0, 2);
                pass.End();
            }
            doubleSidedFx.End();
|
Changing the cull mode in the effect is trivial: render states can be initialized in each pass, which
is a major reason for using effects. The NormalFactor and baseTex shader
variables, on the contrary, can't be assigned a value in the same way, and it
looks like we are in a dead end. However, since NormalFactor has a fixed value
that is known in advance for each pass, one solution is to pass this value to
the vertex shader as a uniform parameter (which means the value is the same for
every vertex), instead of using a shader constant.
Of course, the effect doesn't know anything about the Texture2D objects representing the "front" and
"back" pictures, so, directly changing texture between the two passes is not
possible. The trick this time is to use two samplers, corresponding with the two
textures, that can be passed to the pixel shader as a parameter. Having an
extra sampler would be problematic in complex shaders already using them all,
but it is totally fine here (and remember two-sided objects usually display the
same texture on both sides - having different ones was just a personal touch).
That's it! All the code specific to displaying a 2-sided object is now part of the effect, the C#
program does not do anything special to use this type of rendering rather than
another one.
back to top